Intaglio vs Relief Printing
Engraving belongs to the intaglio family of printing techniques, a category that also includes etching, drypoint, mezzotint, and aquatint. The word intaglio comes from the Italian intagliare, meaning to carve or cut into. In intaglio printing, the image is incised into a plate surface — typically copper, zinc, or steel — and ink is pushed into the grooves. The plate surface is then wiped clean so that ink remains only in the carved channels. When dampened paper is pressed against the plate under enormous pressure in a roller press, it is forced into the grooves and lifts the ink out, creating the printed impression. This stands in contrast to relief printing (such as woodcut or letterpress), where the raised surfaces carry ink and the carved-away areas remain blank. The intaglio approach gives engravings their characteristic quality: fine, precise lines with slightly raised ink that can be felt by running a fingertip across the print surface. This tactile quality, combined with the sharpness of the lines, is why intaglio engraving was adopted for printing banknotes and securities — the texture provides an immediate physical authentication that is difficult to counterfeit.
How Copper Plate Engraving Works Physically
The engraver works with a polished copper plate mounted on a leather sandbag that allows it to be rotated freely. The primary tool is a burin (also called a graver), a short steel rod with a diamond-shaped or lozenge-shaped cutting tip set into a mushroom-shaped wooden handle that fits in the palm. The engraver pushes the burin forward through the copper, curling up a thin ribbon of metal as the tool cuts a groove. By varying the angle and pressure of the burin, the engraver controls the width and depth of the line. A shallow, narrow groove holds less ink and prints as a fine, light line. A deep, wide groove holds more ink and prints dark and bold. To create tonal gradation, the engraver carves parallel lines at varying spacings — closely spaced lines appear dark to the eye, while widely spaced lines appear lighter. Cross-hatching, where a second set of lines is cut at an angle over the first, adds further tonal depth. The physical skill required is extraordinary: the engraver must maintain perfectly controlled hand pressure while pushing a sharp tool through resistant metal, often working under magnification for hours at a time.
The Role of Engravers in Pre-Photography Publishing
Before the invention of photography in the 1830s and the development of photomechanical reproduction later in the nineteenth century, engraving was the only way to reproduce images in printed books, newspapers, and periodicals. Every illustration — whether a botanical diagram, a portrait of a monarch, a map, or a depiction of a historical event — had to be painstakingly carved by a skilled engraver working from an original drawing or painting. The profession employed thousands of artisans across Europe and America. Some engravers specialized in portraiture, developing extraordinary skill at rendering human features using only parallel lines. Others specialized in architectural views, landscapes, or scientific illustration. The great encyclopedias of the eighteenth century, including Diderot and d'Alembert's Encyclopedie, relied on hundreds of engraved plates to document manufacturing processes, natural history, and technology. When you look at the intricate illustrations in these volumes, you are seeing the work of engravers who spent weeks or months on a single plate.
Famous Engraved Works Through History
Beyond Durer, the history of engraving is rich with landmark works. Gustave Dore's engravings for Dante's Divine Comedy and Milton's Paradise Lost created haunting, dramatically lit scenes that remain iconic. The portraits on banknotes worldwide represent perhaps the most widely viewed engravings in existence — the portrait of Benjamin Franklin on the United States hundred-dollar bill, for example, is based on an engraving that renders every wrinkle, hair, and fabric fold through carefully modulated parallel lines. Postage stamps have historically been engraved as well, and stamp engraving remains a specialized art form practiced by a handful of master engravers at national printing bureaus. Book illustrations from the seventeenth through nineteenth centuries — title pages, frontispieces, chapter headings — were overwhelmingly produced by engraving, and the best examples exhibit a warmth and detail that photographic reproduction has never quite matched.
The Sine Wave Engraving Algorithm Explained
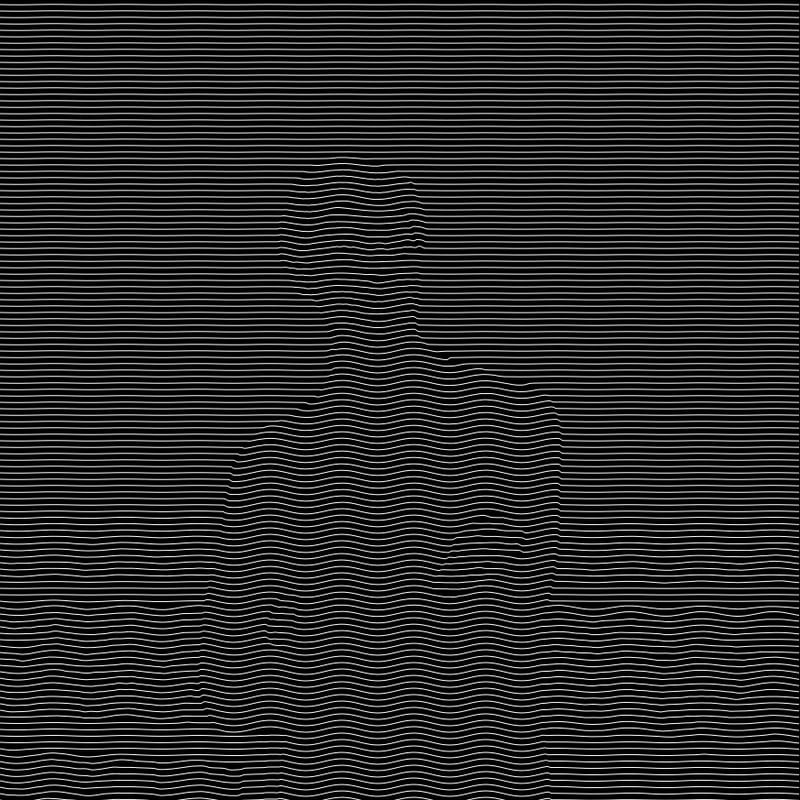
This tool uses a digital algorithm that simulates the visual appearance of hand engraving through sine wave modulation. The process works as follows. First, the source photograph is converted to grayscale, producing a brightness value between 0 (black) and 255 (white) for every pixel. The algorithm then draws a series of horizontal parallel lines across the image at regular vertical intervals. Each line follows a sine wave path, and the amplitude of the wave at any point is determined by the brightness of the underlying pixel. In dark areas of the image, the sine wave amplitude is large, causing the line to oscillate widely and creating thick, prominent marks. In light areas, the amplitude is nearly zero, and the line runs almost straight and thin. In the brightest areas, the line may become so thin as to be barely visible. The mathematical function at work is straightforward: for a given horizontal position x and a given row y, the vertical displacement of the line equals A multiplied by sin(2 pi x / wavelength), where A is the amplitude value derived from the pixel brightness at that location. This simple trigonometric relationship, when applied consistently across thousands of parallel lines, produces a remarkably faithful tonal reproduction of the original photograph.
Line Density, Spacing, and Wavelength Parameters
The visual character of the engraving effect depends on several interrelated parameters. Line spacing (the vertical distance between adjacent sine wave lines) controls the overall density of the engraving. Closer spacing packs more lines into the same area, producing a finer, more detailed result that more closely resembles traditional copper plate work. Wider spacing creates a bolder, more graphic appearance where individual lines are clearly distinguishable. The wavelength of the sine function determines how frequently each line oscillates — shorter wavelengths create rapid, tightly packed waves, while longer wavelengths create gentle, sweeping undulations. The maximum amplitude determines the dynamic range of the tonal reproduction — how wide the darkest waves can become. These parameters interact: very close line spacing combined with high amplitude can cause adjacent lines to overlap, creating areas of solid black, while wide spacing with low amplitude produces a light, airy effect.
Comparison with Other Halftone and Tonal Reproduction Techniques: The sine wave engraving approach is one of several methods for reproducing continuous tone images using only black and white. Traditional halftone printing uses dots of varying sizes arranged in a regular grid — this is the technique used in newspaper and magazine printing and is available separately through our halftone dot pattern tool. Stippling uses randomly or semi-randomly placed dots, with density controlling tone. Cross-hatching uses intersecting sets of parallel straight lines at different angles. Error diffusion dithering (such as the Floyd-Steinberg algorithm used in our laser engraving preparation tool) distributes quantization error across neighboring pixels to create an organic dot pattern. Each technique produces a distinct aesthetic. The sine wave engraving method stands apart because of its historical association with fine printmaking and currency — it carries an immediate visual connotation of craftsmanship, authority, and elegance that dots and random dithering do not.
Security Printing and Anti-Counterfeiting Applications
The engraving aesthetic is inseparable from the world of security printing. Banknotes, stock certificates, bonds, passports, and other high-security documents have relied on intaglio engraving for centuries precisely because the technique is extraordinarily difficult to reproduce. The fine, continuous lines of an engraving have a regularity and precision that photocopiers and inkjet printers cannot replicate — a counterfeit bill produced on a standard printer will show broken lines, dot patterns, or fuzzy edges where the original has clean, continuous grooves. Modern security printing combines traditional engraving with additional features such as microprinting (text so small it appears as a line to the naked eye), latent images (patterns visible only at certain viewing angles), and intaglio ink with distinctive texture. When you apply the vintage engraving effect to an image using this tool, you are tapping into the same visual language that central banks and security printers have used for generations.
Modern Applications of the Engraving Aesthetic
The engraved look has experienced a significant revival in contemporary design. Certificate and diploma borders frequently use engraving-style patterns to convey formality and prestige. Luxury packaging — particularly for wine, spirits, and premium food products — often features engraved illustrations on labels, lending a sense of heritage and craftsmanship. Wedding invitations and formal stationery use engraved motifs to signal elegance. Book covers, particularly for literary classics and special editions, employ engraving-style artwork to evoke historical weight. Album cover art in genres from folk to Americana regularly draws on engraving aesthetics. Even digital interfaces occasionally borrow the visual vocabulary of engraving for decorative headers and background textures.
Achieving Different Engraving Styles Through Parameter Adjustment: By varying the intensity slider in this tool, you can produce markedly different results from the same source image. Low intensity settings create widely spaced lines with subtle amplitude variation — an effect reminiscent of the minimal, delicate engravings found in eighteenth-century scientific illustrations. Medium intensity produces the classic banknote look, with enough line density to reproduce photographic detail while maintaining the characteristic wave pattern. High intensity packs lines tightly together, approaching the density of fine copper plate work where individual lines are barely distinguishable and the overall impression is almost photographic.
Invert Mode for Dramatic Effects
The invert toggle switches the output from traditional black-on-white to white-on-black. This reversal produces a striking, almost luminous effect where the engraved lines appear to glow against a dark background. This mode works beautifully for designs intended for dark paper, dark fabrics, or digital use on dark backgrounds. It can also simulate the appearance of engraved metal plates themselves, where the grooves catch light against a dark surface.
Printing and Reproduction Considerations
If you plan to print your engraved artwork, paper and ink choices significantly affect the final result. Smooth, coated papers reproduce fine engraving lines with the greatest fidelity — matte coated stock is ideal because it holds detail without the distracting sheen of glossy paper. Uncoated papers with some tooth can produce a charming, slightly softened look that mimics the impression of dampened paper pulled from a copper plate. For the most authentic reproduction, consider letterpress or intaglio printing on cotton rag paper, which produces the raised ink texture of genuine engravings. Standard laser printing on smooth paper produces excellent results for certificates, labels, and decorative prints. When sizing your output, keep in mind that the fine lines of the engraving effect are best appreciated at moderate to large print sizes — at very small sizes, the individual waves may merge into undifferentiated gray.
All processing runs entirely in your browser. Your images are never uploaded to any server. Free to use with no registration required.