How to Prepare the Perfect Photo for Tattoo Stencils
Every great tattoo begins long before the needle touches skin. It starts with a photo — and not just any photo. The quality of your reference image directly determines the quality of your stencil, which in turn shapes the final tattoo. Whether you are a professional tattoo artist or someone planning your next piece, understanding how to prepare the perfect photo for stencil conversion is an essential skill that saves time, reduces frustration, and produces cleaner results.
In this guide, we walk through every step of photo preparation, from selecting the right image to adjusting contrast and resolution, so your stencil comes out crisp and transfer-ready every time.
---
Why Photo Quality Matters for Tattoo Stencils
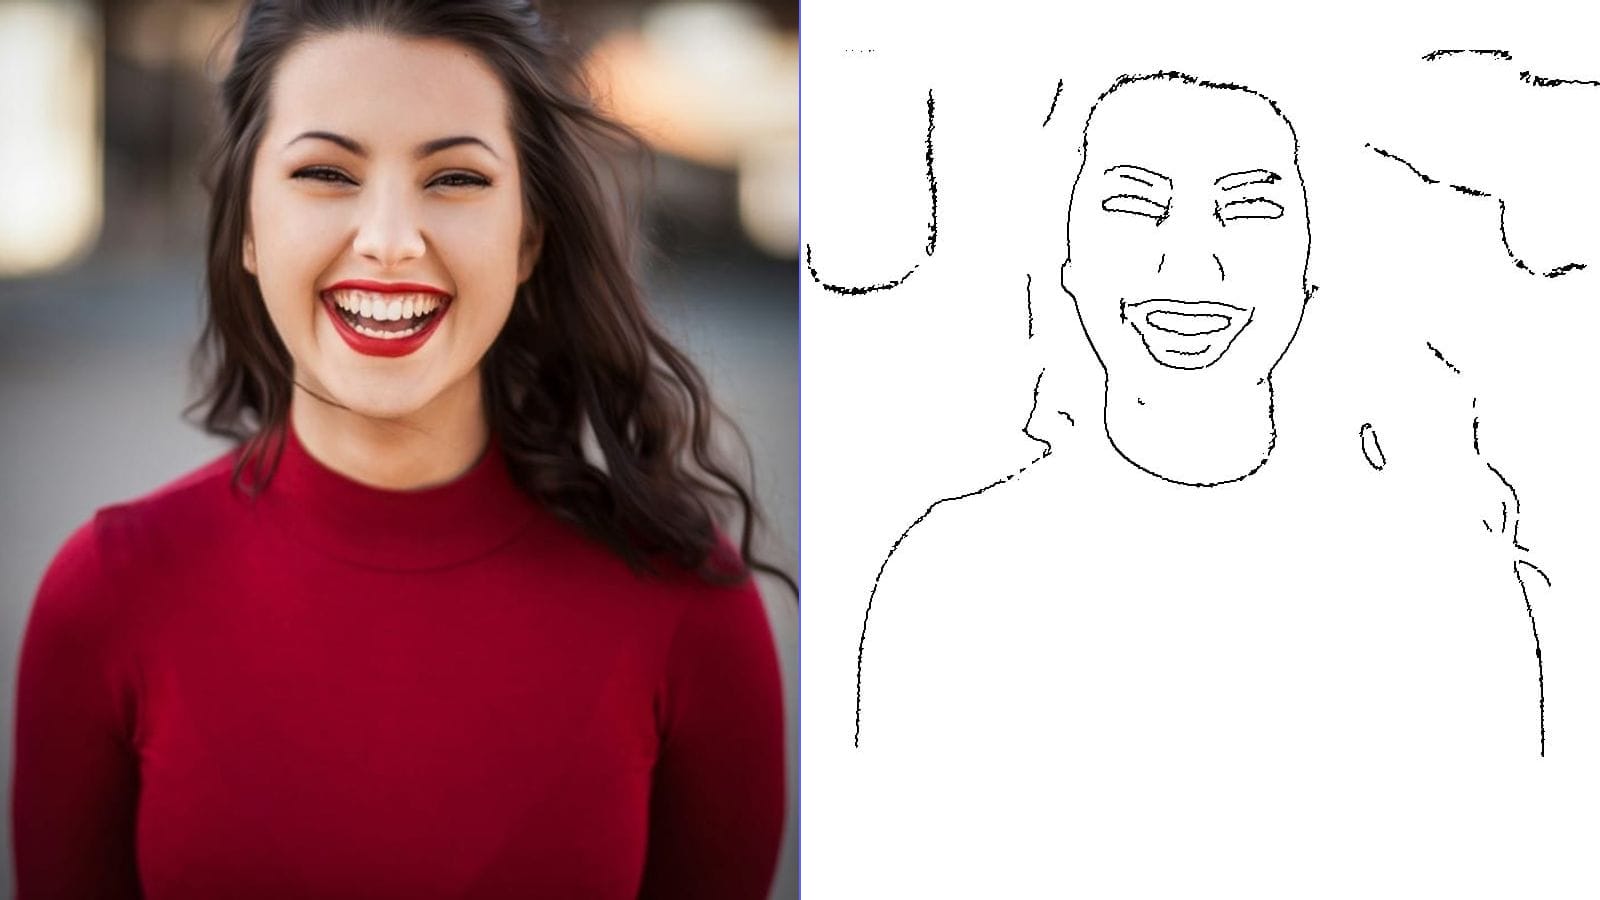
A tattoo stencil is essentially a simplified line drawing extracted from your source image. The conversion process relies on detecting edges, distinguishing foreground from background, and capturing fine details. When you start with a poorly lit, low-resolution, or cluttered photo, the stencil generator has to guess — and guesses lead to muddy lines, lost details, and hours of manual cleanup.
By investing a few minutes in photo preparation, you can:
- Produce stencils with clean, confident lines
- Preserve intricate details like facial features, fur texture, or floral petals
- Reduce the need for manual tracing and correction
- Speed up your entire tattoo workflow
---
Step 1: Choose the Right Photo
Not every image makes a good tattoo stencil. Here is what to look for when selecting your reference photo:
Characteristics of an Ideal Stencil Photo
- Strong subject isolation — The main subject should be clearly separated from the background. Portraits, animals, and single objects work best.
- Clear edges and outlines — Avoid images where the subject blends into its surroundings. Sharp boundaries translate into clean stencil lines.
- Moderate detail level — Extremely busy images with dozens of small elements often produce cluttered stencils. Aim for a balanced composition.
- Front or three-quarter angles — These perspectives tend to capture the most recognizable features and translate well to flat stencil art.
Photos to Avoid
- Group photos with overlapping subjects
- Images with heavy motion blur
- Heavily filtered or over-processed social media photos
- Screenshots or low-resolution downloads
- Photos with watermarks or text overlays
If you are working with a client's photo, do not hesitate to ask for a better reference image. It is far easier to start with the right photo than to fix a bad stencil later.
---
Step 2: Optimize Lighting and Exposure
Lighting is arguably the single most important factor in stencil quality. The conversion algorithm needs clear tonal separation to detect edges, and that separation comes from proper lighting.
Lighting Best Practices
- Use natural, diffused light — Soft daylight from a window produces even illumination without harsh shadows. Overcast days are ideal for outdoor shots.
- Avoid direct flash — On-camera flash creates flat lighting that washes out subtle details and introduces glare.
- Eliminate mixed lighting — Combining warm indoor light with cool daylight creates uneven color casts that confuse edge detection.
- Light the subject from the front or at a slight angle — This ensures all important features are visible and well-defined.
- Watch for deep shadows — While some shadow adds depth, overly dark areas lose detail entirely during conversion.
Quick Exposure Check
Before proceeding, zoom into the key areas of your photo. Can you see texture and detail in both the highlights and the shadows? If the brightest areas are blown out to pure white or the darkest areas are crushed to pure black, adjust your exposure or choose a different image.
---
Step 3: Adjust Contrast for Cleaner Lines
Contrast is the difference between the lightest and darkest areas of your image. For stencil conversion, you want strong but controlled contrast — enough to define clear edges without obliterating mid-tone detail.
How to Adjust Contrast
- Increase contrast slightly — A 10-20% boost in contrast helps edges stand out. Most phone editing apps and desktop tools like Photoshop or GIMP offer simple contrast sliders.
- Use the levels or curves tool — For more precision, pull the black point slightly inward and push the white point inward. This compresses the tonal range and sharpens edge transitions.
- Convert to grayscale first — Working in black and white lets you evaluate tonal separation without color distractions. This is especially helpful for colorful photos where similar-brightness colors might merge.
- Apply local contrast (clarity) — Many editors offer a clarity or structure slider that enhances mid-tone contrast, which is particularly useful for bringing out texture in skin, fabric, or fur.
A Word of Caution
Over-processing creates problems. Pushing contrast too far introduces noise, artifacts, and false edges that clutter your stencil. Make adjustments in small increments, preview the result, and stop when the edges look well-defined but natural.
---
Step 4: Ensure Sufficient Resolution
Resolution determines how much detail your stencil can capture. Low-resolution images produce jagged, pixelated lines that look unprofessional on skin.
Minimum Resolution Guidelines
- For small tattoos (under 4 inches): At least 1000 x 1000 pixels
- For medium tattoos (4-8 inches): At least 2000 x 2000 pixels
- For large tattoos (full sleeve, back piece): 3000 x 3000 pixels or higher
- General rule: Aim for at least 300 DPI at the intended print size
How to Check Resolution
On most devices, you can right-click or long-press an image file to view its dimensions. If the image is too small, do not rely on upscaling software — it cannot add detail that was never there. Instead, find or request a higher-resolution original.
---
Step 5: Clean Up the Background
Busy backgrounds are the enemy of clean stencils. Trees, furniture, other people, and patterned walls all introduce unwanted lines that compete with your subject.
Background Cleanup Options
- Shoot against a plain wall or backdrop — White, black, or any solid neutral color works well.
- Use portrait mode on your phone — The artificial background blur helps separate the subject, though be aware it can sometimes blur edges of the subject itself.
- Remove the background manually — Tools like Photoshop's Quick Selection or free online background removers can isolate your subject before conversion.
- Crop tightly around the subject — Even a simple crop that removes most of the background clutter can dramatically improve stencil quality.
The cleaner your background, the less time you spend erasing stray lines from your finished stencil.
---
Step 6: Convert Your Photo to a Tattoo Stencil
Once your photo is properly prepared, you are ready to generate the stencil. The Tattoo Stencil Maker on MakeLineArt is specifically designed for this purpose. It runs entirely in your browser — no uploads, no accounts, no software to install — and produces clean line art optimized for thermal transfer paper.
Conversion Tips
- Upload your prepared photo and use the threshold and detail sliders to fine-tune the output
- Preview the stencil at full size before downloading to catch any areas that need adjustment
- Use the mirror flip feature to reverse the image for transfer paper application — this ensures the design appears correctly oriented on the skin after transfer
- Download the final stencil as a high-resolution PNG for the sharpest print quality
---
Bonus: Explore Related Art Styles
The same photo preparation principles apply to other line art styles that are gaining popularity in the tattoo world:
- Minimalist Line Art Avatar — Perfect for portrait tattoos that use a single continuous weight to capture facial features with elegant simplicity.
- One Line Drawing — Converts photos into single-line art, a trending tattoo style that conveys subjects with just one unbroken stroke.
Both styles benefit enormously from well-prepared source photos, so the steps in this guide apply equally.
---
Final Checklist Before Stencil Conversion
Before you hit the convert button, run through this quick checklist:
- [ ] Subject is clearly isolated with defined edges
- [ ] Lighting is even with no blown highlights or crushed shadows
- [ ] Contrast has been moderately boosted
- [ ] Image resolution is at least 1000 x 1000 pixels
- [ ] Background is clean or removed
- [ ] Image is cropped tightly around the subject
- [ ] Photo is free of watermarks, text, or heavy filters
Following these steps consistently will elevate the quality of every stencil you produce. Great tattoos start with great preparation — and a few minutes of photo work today saves hours of frustration at the station tomorrow.
Ready to convert your perfectly prepared photo? Try the free Tattoo Stencil Maker and see the difference proper preparation makes.