Why Photo-Based Stencils Produce Better Results Than Hand-Drawn Ones
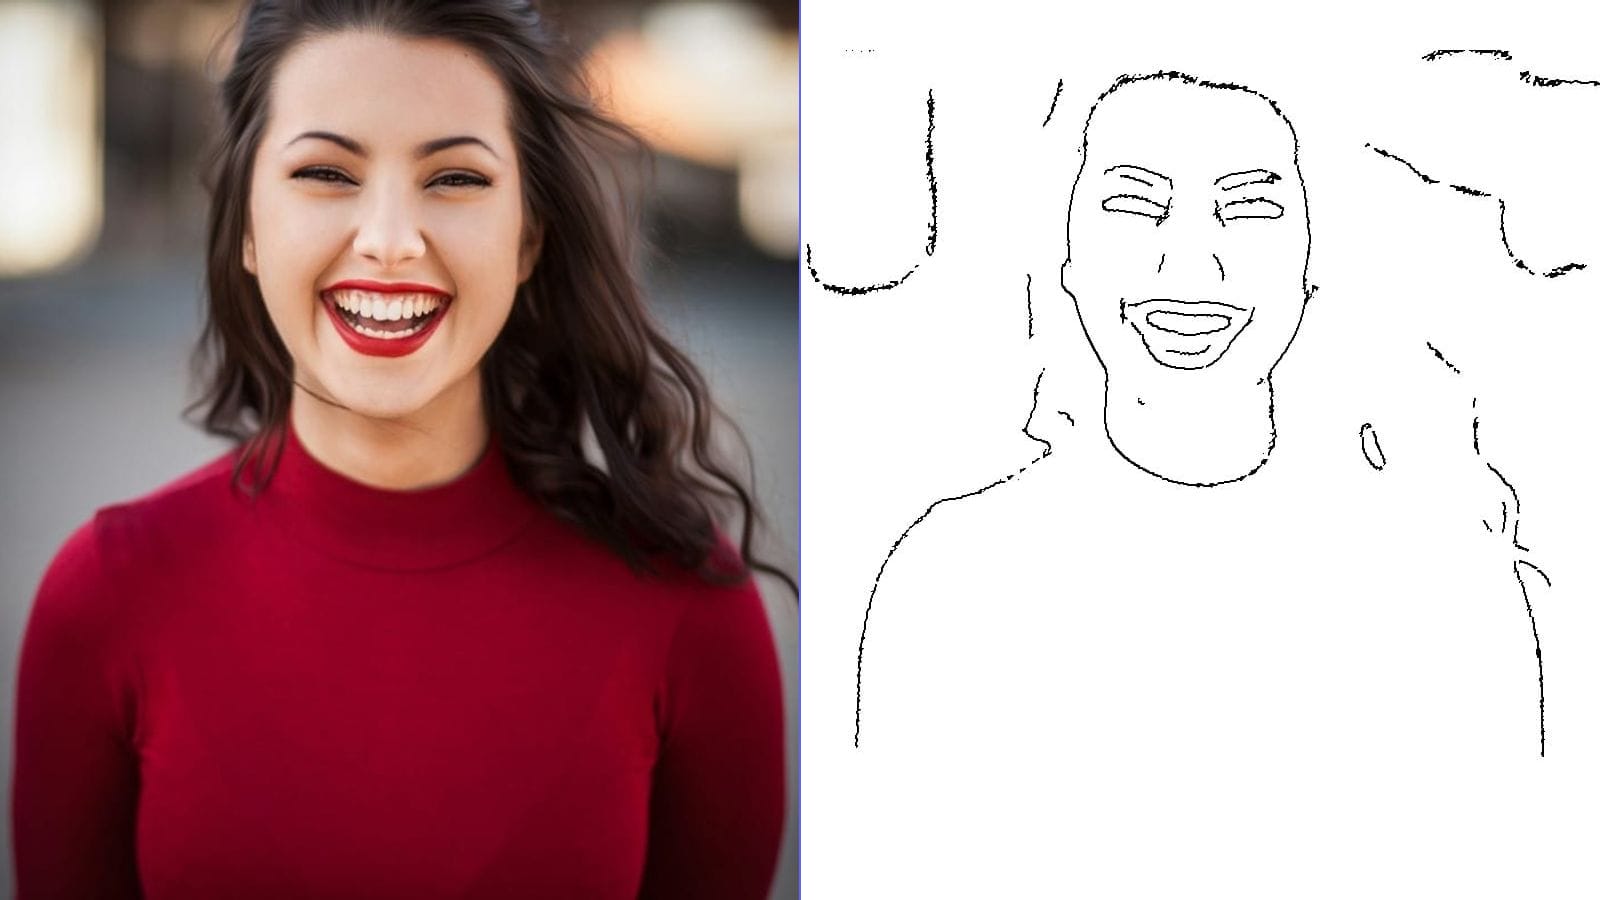
Creating a stencil from scratch requires artistic skill, patience, and hours of careful tracing. Converting a photograph into a stencil flips this process — you start with a perfect image and let an algorithm extract the essential shapes and contours. The result is a clean, printable stencil that captures details no hand could replicate from memory.
Photo-based stencils are used across an enormous range of creative projects. Tattoo artists use them to transfer client-approved designs onto skin. Street artists use them for spray paint murals. Crafters use them for fabric painting, pumpkin carving, glass etching, and woodworking. DIY enthusiasts use them for home decor projects like wall stenciling and furniture upcycling. In every case, starting from a photograph means starting from reality — and the stencil carries that authenticity into the final piece.
What Makes a Great Stencil Photo
The single most important factor in stencil quality is your source photo. A well-chosen photo produces a clean stencil with minimal cleanup. A poorly chosen one produces a noisy mess that requires extensive editing.
Best Photos for Stencils
- High contrast subjects: Dark subjects against light backgrounds (or vice versa) produce the cleanest stencil separations.
- Clear silhouettes: Side profiles, full-body outlines, and objects with distinctive shapes translate beautifully into stencils.
- Simple backgrounds: A plain wall, clear sky, or solid surface behind your subject ensures the algorithm focuses on what matters.
- Strong lighting: Dramatic lighting with clear shadows helps define edges. Side lighting and golden hour light work particularly well.
- Bold features: Subjects with strong, recognizable features — a face in profile, a distinctive building, a bold logo — make the most striking stencils.
Photos to Avoid for Stencils
- Photos with busy, cluttered backgrounds
- Evenly lit photos with minimal contrast (flat lighting)
- Subjects that blend into their background
- Very detailed textures without clear outlines (grass, fur close-ups)
- Blurry or out-of-focus images
Step-by-Step: Creating a Stencil with MakeLineArt
Our free stencil maker converts any photo into a printable stencil in seconds. No account needed, no software to install, and your photos never leave your device.
Step 1: Upload Your Photo
Visit the stencil maker and drag your photo onto the upload area, or tap to browse your files. The tool accepts JPG, PNG, and WebP formats up to any size.
Step 2: Adjust the Intensity
The intensity slider controls how much detail the stencil captures. For a bold, simple stencil with strong shapes, keep the slider on the lower end. For a detailed stencil that preserves finer features — facial expressions, hair texture, clothing folds — move the slider higher.
Start with a medium setting and adjust from there. You can preview changes in real time.
Step 3: Fine-Tune with Line Weight
The line weight control lets you thicken or thin the stencil lines. Thicker lines are easier to cut and more forgiving during transfer. Thinner lines capture more detail but require more precision when cutting or painting.
For spray paint stencils, thicker lines are generally better. For tattoo transfers, thinner lines allow the artist more creative freedom during the actual tattoo session.
Step 4: Use Mirror Flip (for Tattoo Stencils)
If you are creating a stencil for tattoo transfer paper, enable the Mirror Flip toggle. This horizontally flips the image so that when the thermal transfer paper is pressed against skin, the design reads correctly. This is a critical step that many beginners forget.
Step 5: Download and Print
Hit the download button to save your stencil as a high-resolution PNG. The output features pure white backgrounds and crisp black lines, optimized for clean printing.
Stencil Applications: Five Popular Use Cases
1. Tattoo Stencils
Professional tattoo artists and DIY tattoo enthusiasts use photo-based stencils to transfer designs onto skin. The process typically involves:
- Converting the reference photo to a stencil using the stencil maker
- Printing the stencil on thermal transfer paper
- Applying the transfer to clean, shaved skin using stencil transfer solution
- Tattooing over the transferred lines
Our stencil maker is designed with tattoo artists in mind. The Mirror Flip function, adjustable line weight, and noise-free output all address common pain points in the tattoo stencil workflow.
2. Spray Paint Art and Street Art
Stencil-based spray painting produces sharp, repeatable designs on walls, canvas, furniture, and more. For spray paint stencils:
- Use cardstock or acetate sheets for durability
- Cut out the black areas with a craft knife
- Secure the stencil to your surface with low-tack painter's tape
- Apply spray paint in light, even coats
- Remove the stencil carefully before the paint fully dries
For multi-color designs, create separate stencils for each color layer by adjusting the intensity slider to capture different tonal ranges.
3. Cricut and Vinyl Cutting
Many crafters want to turn photos into SVG files for Cricut and other cutting machines. While our tool exports PNG files, you can use the stencil output as a starting point:
- Convert your photo to a stencil with the stencil maker
- Import the high-contrast PNG into a vector tracing tool
- The clean, high-contrast output from our stencil maker traces much more accurately than a raw photograph
The key advantage is that our algorithm eliminates photographic noise and background clutter before you trace, producing much cleaner vector results.
4. Glass Etching and Engraving
Photo stencils work beautifully for glass etching projects — wine glasses, mirrors, windows, and decorative panels. Use adhesive vinyl as your stencil material:
- Create your stencil from a photo
- Cut the design from adhesive vinyl using a craft knife or cutting machine
- Apply the vinyl to clean glass
- Apply etching cream to the exposed areas
- Remove the vinyl to reveal your etched design
Simple designs with clear shapes work best for glass etching. Portraits, pet silhouettes, and botanical subjects are popular choices.
5. Pumpkin Carving
During Halloween season, photo-based stencils let you carve personalized pumpkins featuring family faces, pets, or custom designs. Our dedicated pumpkin carving stencil maker is specifically tuned for this purpose, but the general stencil maker works well too.
Tips for Cutting and Transferring Stencils
Choosing Your Stencil Material
- Regular paper: Good for single-use stencils and tattoo transfers
- Cardstock: Stiffer and more durable for spray painting (2-3 uses)
- Acetate or mylar: Best for reusable stencils (dozens of uses)
- Adhesive vinyl: Perfect for glass etching and precision work
- Freezer paper: Iron-on for fabric stenciling
Cutting Tips
- Use a sharp craft knife (X-Acto) on a self-healing cutting mat
- Cut toward yourself for better control, rotating the material rather than the knife
- Start with the smallest interior details first, then cut the larger areas
- Leave "bridges" (thin connections) between isolated areas to keep the stencil structurally sound
Transfer Tips for Tattoo Stencils
- Clean the skin thoroughly with rubbing alcohol before applying
- Use professional stencil transfer solution (Speed Stick deodorant works in a pinch)
- Press firmly and evenly — do not rub or slide
- Let the transfer dry completely before beginning the tattoo
- Consider printing at 100% scale to ensure accurate sizing
Privacy and Security
When converting photos of people — whether for tattoo stencils, portrait art, or memorial pieces — privacy matters. Our stencil maker processes everything directly in your browser using WebAssembly technology. Your photos are never uploaded to any server. They stay on your device, and closing the tab destroys all data immediately.
This is particularly important for tattoo artists handling client reference photos. No client photo is ever stored, transmitted, or accessible to anyone other than you.
From Photo to Finished Project
The gap between a photograph and a finished creative project used to require artistic skill or expensive software. A free online stencil maker bridges that gap instantly. Whether you are a tattoo artist preparing client stencils, a crafter cutting vinyl for a Cricut project, or a parent creating a custom pumpkin carving pattern, the process is the same: upload a photo, adjust the settings, download your stencil.
Try the free stencil maker and create your first custom stencil in under a minute. For line art projects that require finer detail, check out our line art converter. And for seasonal pumpkin carving patterns, the pumpkin stencil maker is tuned specifically for that purpose.