How to Create Custom T-Shirt Designs from Your Photos — Complete DIY Guide
Turning your favorite photographs into wearable art is one of the most satisfying DIY projects you can tackle. Whether you want to immortalize a pet portrait, create matching shirts for a family reunion, or launch a small apparel brand, the process starts with understanding how different printing methods work and how to prepare your images for each one. This comprehensive guide walks you through every major t-shirt printing method, explains why photos almost always need conversion before printing, and gives you the practical knowledge to produce professional-quality results at home or through a print service.
Why Photos Need Conversion for Most Printing Methods
A photograph straight from your camera is a continuous-tone image — it contains millions of colors and smooth gradients between light and dark areas. Most t-shirt printing methods cannot reproduce continuous-tone images directly. Screen printing uses solid layers of ink. Heat transfer vinyl is cut from solid-colored sheets. Even sublimation and direct-to-garment printing, which can handle photographic detail, often produce better results when the image has been simplified or stylized.
Converting a photo to a line drawing, a high-contrast graphic, or a halftone pattern transforms it into a format that these printing methods can handle cleanly. The conversion also tends to produce more visually striking results on fabric. A detailed photograph can look muddy or washed out on a t-shirt, while a bold line art version of the same image reads clearly from across a room.
Understanding this fundamental requirement — that most printing methods work best with simplified artwork — is the key to successful custom t-shirt creation.
Overview of DIY T-Shirt Printing Methods
Screen Printing
Screen printing is the oldest and most widely used method for printing on textiles. The process involves creating a stencil (the "screen") on a mesh frame, placing it over the fabric, and pushing ink through the open areas of the stencil with a squeegee.
How it works: You create your design as a high-contrast black-and-white image. This image is printed onto a transparency film, which is used to expose a photo-sensitive emulsion on the screen. Light hardens the emulsion everywhere except where the design blocks it. You wash away the unhardened emulsion, leaving open mesh in the shape of your design. Ink passes through these open areas onto the fabric.
Best for: Bold graphics, text, logos, and designs with limited colors. Each color requires a separate screen, so designs with one to three colors are most practical for DIY work.
Limitations: Not suitable for full-color photographic reproduction without halftone conversion. Setup takes time and materials. Best for batch production rather than one-off prints.
Cost: Starter kits with screens, emulsion, squeegees, and inks run between fifty and two hundred dollars. Per-shirt material cost is very low once you have the setup, typically under two dollars per print.
Heat Transfer Vinyl (HTV)
Heat transfer vinyl involves cutting designs from sheets of colored vinyl using a cutting machine (like a Cricut or Silhouette), then pressing the cut vinyl onto fabric with a heat press or household iron.
How it works: You create your design as a vector or high-contrast image. The cutting machine traces the design and cuts it from a sheet of vinyl. You "weed" away the excess vinyl, leaving only your design on a carrier sheet. Then you apply heat and pressure to bond the vinyl to the fabric.
Best for: Simple graphics, text, names, numbers, and single-color designs. HTV produces crisp, opaque results with a slightly raised texture.
Limitations: Multi-color designs require layering different colors of vinyl, which becomes tedious beyond three or four colors. Not suitable for photographic images or fine detail. The vinyl has a distinct feel on the fabric — it is smooth and slightly plastic.
Cost: A cutting machine costs between two hundred and four hundred dollars. Vinyl sheets cost between two and five dollars each. A quality heat press costs one hundred to three hundred dollars, though a household iron can work for small projects.
Sublimation Printing
Sublimation uses special inks that convert from solid to gas under heat and pressure, bonding permanently with polyester fibers. The result is a print that is part of the fabric rather than sitting on top of it.
How it works: You print your design in mirror image onto sublimation transfer paper using a printer loaded with sublimation inks. You place the printed paper face-down on a polyester garment and apply heat (around 400 degrees Fahrenheit) and pressure for about sixty seconds. The ink sublimates — turns to gas — and penetrates the polyester fibers, producing a permanent, full-color print.
Best for: Full-color designs, photographic images, all-over prints. Sublimation produces vibrant, detailed results with no texture change to the fabric.
Limitations: Only works on polyester or polyester-coated surfaces. Does not work on cotton. The fabric must be white or very light colored, as sublimation inks are transparent. Cannot produce white ink.
Cost: A sublimation printer (converted Epson EcoTank models are popular) costs between three hundred and five hundred dollars. Sublimation ink and paper are ongoing costs, roughly one to three dollars per print.
Direct-to-Garment (DTG) Printing
DTG printers work like large inkjet printers that print directly onto fabric. They can reproduce full-color photographic images with fine detail on virtually any color of cotton or cotton-blend garment.
How it works: The garment is placed on a platen, and the printer sprays textile ink directly onto the fabric surface. For dark garments, a white base layer is printed first, then the color image is printed on top. The garment is then heat-cured to set the ink.
Best for: Full-color designs, photographic images, small batch or one-off production. DTG handles complexity and color gradients better than any other method.
Limitations: DTG printers are expensive — professional models start at several thousand dollars, making them impractical for casual DIY use. Per-print costs are higher than screen printing for large batches. Print durability is generally good but not quite as resilient as screen printing.
Cost: Most people access DTG through print-on-demand services rather than purchasing a printer. Services like Printful, Printify, and Gooten charge between eight and fifteen dollars per shirt, handling all printing and shipping.
Iron-On Transfers
Iron-on transfer paper is the most accessible entry point for DIY t-shirt printing. You print your design onto special transfer paper using a regular inkjet printer, then iron it onto a garment.
How it works: Print your design (mirror-reversed for most transfer papers) onto iron-on transfer paper. Place the printed paper face-down on the fabric and press with a hot iron for thirty to sixty seconds, applying firm, even pressure. Peel away the backing paper to reveal the transferred image.
Best for: One-off projects, quick gifts, children's activities. Transfer paper can handle full-color images, including photographs.
Limitations: Print quality and durability are the lowest of all methods. Transfers tend to crack, peel, and fade after multiple washes. The transferred area has a distinct, somewhat stiff texture. Colors are less vibrant than other methods.
Cost: Very low. Transfer paper costs between ten and twenty dollars for a pack of ten to twenty sheets. No special equipment beyond a regular inkjet printer and household iron.
Choosing Your Design Approach: Line Art vs. Halftone vs. Solid Graphic
Line Art Conversion
Converting a photo to line art produces clean, bold outlines that work exceptionally well with screen printing and HTV. The result looks like a hand-drawn illustration of the original photo. Line art is resolution-independent at its core — the lines are either there or they are not, so there are no gradients to worry about.
Line art works best when the original photo has strong, clear edges and good contrast between the subject and background. Portraits, architecture, vehicles, and animals with distinct silhouettes all convert well to line art.
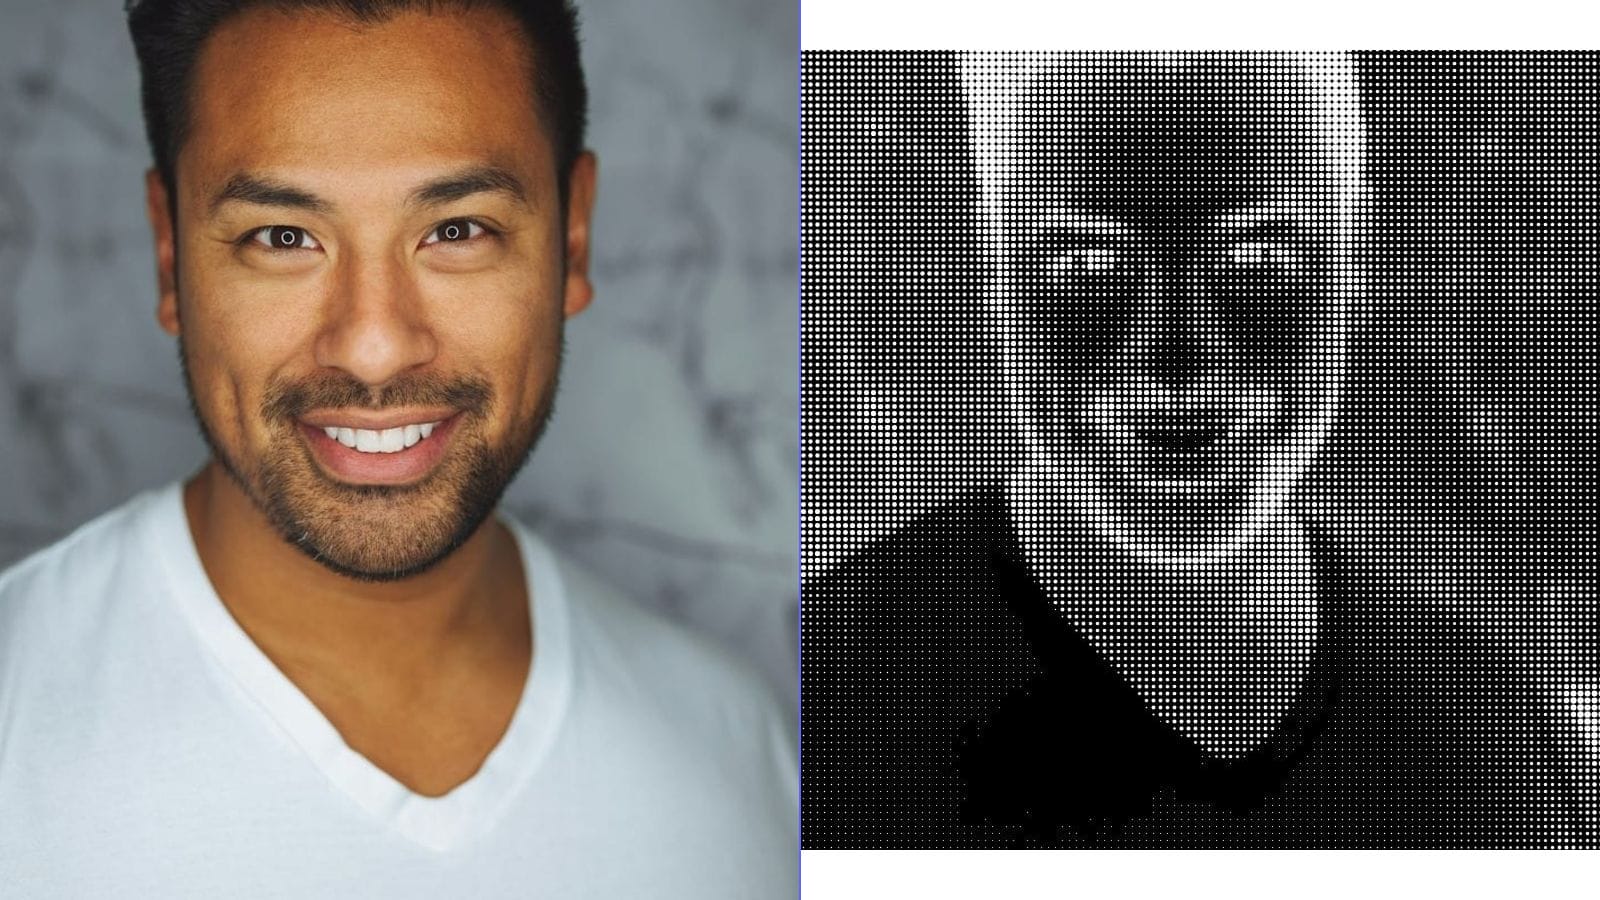
Halftone Conversion
Halftone converts continuous tones into patterns of dots. Larger dots represent darker areas, and smaller dots (or no dots) represent lighter areas. From a distance, the eye blends the dots together and perceives smooth gradation. This technique allows screen printing to reproduce tonal images using a single color of ink.
Halftone is the traditional solution for printing photographs via screen printing. Newspaper photos used halftone for over a century. For t-shirts, a coarser halftone pattern (larger dots, more spacing) tends to produce more visually interesting results than a fine pattern that tries to approximate photographic smoothness.
Solid Graphic / High-Contrast Conversion
This approach reduces the photo to pure black and white — no gray tones, no gradients. The result is a bold, graphic image with strong visual impact. Think of the famous Che Guevara image or Shepard Fairey's Obama "Hope" poster (which used a limited palette of solid colors derived from a similar process).
High-contrast conversion works well when the original photo has dramatic lighting. Side-lit portraits, silhouettes, and architectural images with strong shadow patterns all yield compelling results.
Photo Selection Tips
Not every photo converts well for t-shirt printing. Here is what to look for:
Strong subject-background separation. The subject should stand out clearly from the background. A person photographed against a plain wall will convert much better than someone in a busy crowd scene.
Good lighting and contrast. Photos with clear light and shadow areas convert to line art and high-contrast graphics more successfully than flat, evenly lit images. Side lighting, rim lighting, and dramatic overhead lighting all produce strong edge definition.
Simple compositions. A single subject or a small group works better than a complex scene with many elements. Remember that fine detail tends to be lost in the printing process, so images that rely on intricate detail for their impact are poor candidates.
High resolution. Start with the highest resolution image available. You can always reduce detail during conversion, but you cannot add resolution that was not there to begin with. Aim for images that are at least 300 DPI at the final print size.
Clean backgrounds. If possible, photograph your subject against a solid or simple background. This makes it much easier to isolate the subject during the conversion process.
Step-by-Step Workflow for Screen Printing a Photo-Based Design
- Select and prepare your photo. Choose a high-contrast image with a clear subject. Crop tightly around the subject.
- Convert to printable artwork. Transform the photo into line art, halftone, or high-contrast black and white. Online conversion tools can handle this step — adjust the intensity and threshold settings until you get a clean result with the right level of detail.
- Size your design. Standard chest print dimensions are approximately ten to twelve inches wide by twelve to fourteen inches tall. Size your design within these boundaries, keeping in mind that larger designs are more impressive but harder to print evenly.
- Print the film positive. Print your design onto transparency film using a laser printer or inkjet printer with dark, opaque black output. The black areas must be completely opaque — hold the transparency up to a light to check.
- Coat and expose the screen. Apply photo-sensitive emulsion to your screen, let it dry in a dark room, then expose it to UV light with the film positive placed on top. Exposure times vary by emulsion type and light source — follow the manufacturer's instructions.
- Wash out the design. Spray the screen with water from both sides. The unexposed emulsion (under the black areas of your design) washes away, leaving open mesh in the shape of your artwork.
- Set up for printing. Secure the screen in a hinge clamp or press. Place your t-shirt on a flat surface or platen underneath, with cardboard inside the shirt to prevent bleed-through.
- Print. Apply a line of ink above the design area. Pull the squeegee firmly across the screen at a forty-five-degree angle, pressing the ink through the mesh and onto the fabric. Lift the screen and check the result.
- Cure the ink. Heat-set the ink according to the manufacturer's instructions. Most plastisol inks cure at around 320 degrees Fahrenheit. A heat press, conveyor dryer, or even a household iron (with a protective cloth) can work.
Ink and Material Considerations
Plastisol ink is the standard for screen printing. It sits on top of the fabric, produces vibrant opaque colors, and cures with heat. It works on any fabric color and is very durable.
Water-based ink soaks into the fabric, producing a softer hand feel with no raised texture. It is better for the environment but requires more skill to print — it dries in the screen if you work too slowly, and it is less opaque on dark fabrics.
Discharge ink removes the fabric dye and replaces it with pigment, creating an ultra-soft print that feels like part of the fabric. It only works on natural fibers and requires careful handling due to the chemicals involved.
For fabric selection, one hundred percent cotton is the most versatile choice. It works with screen printing, DTG, HTV, and iron-on transfers. Cotton blends (50/50 cotton-polyester) are also widely compatible. Pure polyester is required for sublimation but limits other printing options.
Ring-spun cotton produces a smoother printing surface than open-end cotton. Combed cotton is even smoother. For the best print quality, choose a shirt made from ring-spun or combed cotton with a tight weave and smooth surface.
Design Placement Guide
Center chest is the most common and versatile placement. Standard dimensions are ten to twelve inches wide, positioned three to four inches below the collar. This is the default choice for most designs.
Left chest (pocket area) works well for smaller logos and monograms. Standard size is three to four inches square. This placement feels more subtle and professional than a large center chest print.
Full back is ideal for large, detailed designs. You have more surface area to work with — up to fourteen inches wide and seventeen inches tall. Back prints are popular for event shirts, band merchandise, and statement designs.
Sleeve prints add a distinctive touch. They work best as small logos, text, or simple graphics, typically two to three inches in height.
Oversized / all-over prints cover the entire front or back of the shirt. These require sublimation or specialized DTG equipment and create a high-impact, fashion-forward look.
Washing and Care Instructions
Proper care dramatically extends the life of printed t-shirts:
- Turn shirts inside out before washing
- Use cold water on a gentle cycle
- Avoid bleach and harsh detergents
- Hang dry or tumble dry on low heat — high heat can damage prints over time
- Do not iron directly over the printed area
- Wait at least twenty-four hours after printing before the first wash to allow inks to fully cure
Screen-printed shirts with properly cured plastisol ink can last fifty or more washes without significant degradation. HTV and iron-on transfers are less durable — expect some cracking or peeling after twenty to thirty washes. Sublimation prints are extremely durable since the ink is part of the fiber, and they can last the lifetime of the garment.
Commercial vs. Personal Use
If you are creating shirts for personal use, gifts, or non-commercial events, you generally have wide freedom in using your own photographs. However, if you plan to sell shirts commercially, consider these important points:
- You must own the rights to the photograph or have explicit permission from the photographer.
- Photos of recognizable people require a model release for commercial use.
- Trademarked logos, brand names, and copyrighted characters cannot be used without licensing.
- Fan art and parody exist in a legal gray area — consult a lawyer before selling designs based on existing intellectual property.
- Stock photos often have licensing restrictions that prohibit use on merchandise — read the license carefully.
Cost Comparison of Methods
| Method | Startup Cost | Per-Shirt Cost | Best For | Quality |
|---|---|---|---|---|
| Screen Printing | $50–$200 | $1–$3 | Batches of 10+ | Excellent |
| HTV | $200–$600 | $3–$8 | Small batches, text | Very Good |
| Sublimation | $300–$500 | $1–$3 | Full-color on polyester | Excellent |
| DTG (via service) | $0 | $8–$15 | One-offs, full-color | Very Good |
| Iron-On Transfer | $10–$30 | $1–$2 | Quick one-offs | Fair |
Where to Order Custom Prints
If you prefer not to print at home, numerous services will print your designs for you:
Print-on-demand platforms like Printful, Printify, Gooten, and Teespring handle everything — printing, packing, and shipping. You upload your design, they produce each shirt as it is ordered. No inventory risk, but higher per-unit costs.
Local print shops offer screen printing and DTG services. They are ideal for batch orders (usually minimum ten to twenty-five pieces) and can provide guidance on artwork preparation. Prices typically range from five to fifteen dollars per shirt depending on quantity and print complexity.
Online custom printers like CustomInk, RushOrderTees, and UberPrints let you upload designs and order specific quantities. They are a good middle ground between print-on-demand and local shops.
Frequently Asked Questions
What is the minimum order for screen printing?
For DIY screen printing, there is no minimum — you can print a single shirt. Professional screen printers typically require minimums of twelve to twenty-five pieces because of the setup time and materials involved in creating screens.
Can I print a full-color photograph on a t-shirt at home?
Yes, using iron-on transfer paper and an inkjet printer. However, the quality and durability will be limited. For better results, use a sublimation printer (polyester shirts only) or order through a DTG print service.
Do I need to convert my photo before printing?
For screen printing and HTV, yes — you need to convert to line art, halftone, or high-contrast artwork. For sublimation, DTG, and iron-on transfers, you can technically print a full-color photograph, but even these methods often produce better results with some image preparation — adjusting contrast, removing backgrounds, or simplifying the design.
How do I make my design last longer on the shirt?
Follow proper washing instructions: cold water, inside out, low or no heat drying. Choose high-quality inks and ensure proper curing during the printing process. Screen printing with plastisol ink and sublimation both produce very durable results.
What file format should my design be in?
For most printing methods, provide your design as a high-resolution PNG file (300 DPI at print size) with a transparent background. For screen printing, a pure black-and-white image works best. For HTV and cutting machines, SVG (vector) format is ideal.
Can I use any t-shirt for printing?
Different methods require different fabrics. Cotton works with screen printing, DTG, HTV, and iron-on transfers. Sublimation requires polyester. For best results with any method, choose a high-quality shirt with a smooth, tight weave. Pre-shrunk shirts help prevent design distortion after washing.